Personal files which are saved in our personal computer are very important to us,it may be our personal photos,credit card card information or confidential office documents.We don’t want anyone to access our personal files without our knowledge simply because privacy is more important for us.sometimes our personal photos which are shared with our friends using our personal Gmail, YahooMail, HotMail are misused when its hacked.A simple solution to save our privacy is by password protecting our confidential documents or photos whenever we share with our friends. You can share your photos or documents with your friends in password protected RAR files or ZIP files,in this case even if your mail got hacked your password protected photos or documents still saved from falling in to wrong hands. Well, How to do that ??? it’s very simple, just follow the below 3 step tutorial
Step 1 – Install WinRar
WinRar is very light weight compressing software which is used worldwide nearly 500 million people using this Tool Worldwide, most of visitors here already familiar with this software.WinRar is mainly used for Compressing files in an efficient way and one of the main advantage is WinRar is available for all Platforms such as Windows,Mac,Linux & Free BSD in 50 Languages.Click Download icon below to download WinRar, after downloading Install in your PC/Laptop.
Step 2 – Choose the Files
Next step is to Choose the Files you wanted Encrypt. For example: if you want to mail 10 photos to your friend,Choose the photos you want to send and put them in a new folder and give any name to the folder(Remember you can’t send more than 25MB in GMail ) So let the Files you chose be lesser than 25MB if you plan to send them through Mail.If your File size is more than 25 MB then you can use Cloud Storage options such as SkyDrive,DropBox,BoX and other Cloud storage services.
Step 3 – Set Password
Check Video Tutorial below
[youtube id=”fVTGFGfZgpo” mode=”normal” align=”center”]
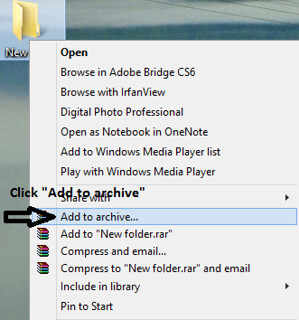
1) Now Right Click the Folder where you saved your Photos and choose “Add to Archive”
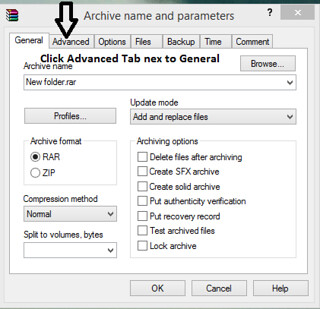
2)After that Click the “Advanced “ Tab next to General at the Top
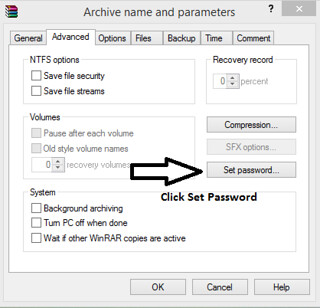
3)Choose “Set Password” option
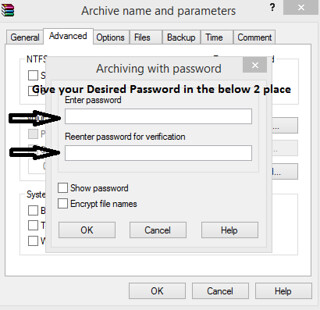
4)Screen will pop up now give your desired password and click “OK”
Leave a Reply